🚀 Automatic User Provisioning
Streamline user onboarding with automatic user provisioning for OIDC authentication. Let Booklore automatically create user accounts when users log in through your OIDC provider, eliminating manual account creation and reducing administrative overhead.
Automatic user provisioning is only available when OIDC authentication is enabled. Users logging in through internal authentication must still be created manually.
🌟 What You'll Achieve
With automatic user provisioning enabled, you can:
- Eliminate manual user creation for OIDC-authenticated users
- Streamline onboarding by allowing new users to access Booklore immediately after first login
- Standardize permissions by assigning default roles and library access automatically
- Reduce administrative burden with self-service account creation
- Control access levels through configurable default permissions and libraries
- Maintain security while providing seamless user experience
✨ How Automatic Provisioning Works
🔄 The Provisioning Flow
Understanding the automatic provisioning flow helps you configure appropriate defaults:
-
👤 New User Attempts Login
A user who doesn't exist in Booklore attempts to log in through your OIDC provider (e.g., Pocket ID, Authentik). The user must successfully authenticate with the OIDC provider. -
🔍 Booklore Checks User Existence
After successful OIDC authentication, Booklore receives user information from the OIDC provider including username, email, and display name based on your configured claim mappings. -
⚡ Automatic Account Creation
If auto-provisioning is enabled and no matching user exists, Booklore automatically creates a new user account with:- Username from the configured username claim
- Email from the configured email claim
- Display name from the configured name claim
- Default permissions you've configured
- Access to default libraries you've selected
-
✅ Access Granted
The newly provisioned user is immediately logged in and can start using Booklore with their assigned permissions and library access.
⚙️ Configuration Options
Understanding Auto-Provisioning Settings
When you enable automatic user provisioning, you control exactly what new users can do:
🔐 Default Permissions
Choose which permissions automatically provisioned users receive. All users get "Read Books" by default, and you can add:
- Upload Books - Allow users to add new books to libraries
- Download Books - Enable book downloads in various formats
- Edit Book Metadata - Grant permission to modify book information
- Manage Library - Allow library management and organization
- Email Book - Enable sending books via email
- Delete Book - Grant permission to remove books from libraries
- KOReader Sync - Enable KOReader device synchronization
- Kobo Sync - Allow Kobo device synchronization
- Access OPDS - Grant access to OPDS catalog feeds
📚 Default Libraries
Select which libraries newly provisioned users can access. Users will only see and interact with books in their assigned libraries.
Start with minimal permissions and expand access as needed. It's easier to grant additional permissions than to revoke them after users have started working with the system.
🚀 Enabling Automatic Provisioning
Step 1: Ensure OIDC is Configured
Before enabling automatic provisioning, you must have OIDC authentication properly configured and tested:
1. Complete OIDC Setup
If you haven't already configured OIDC authentication, follow one of our comprehensive integration guides:
📚 Setup Guides:
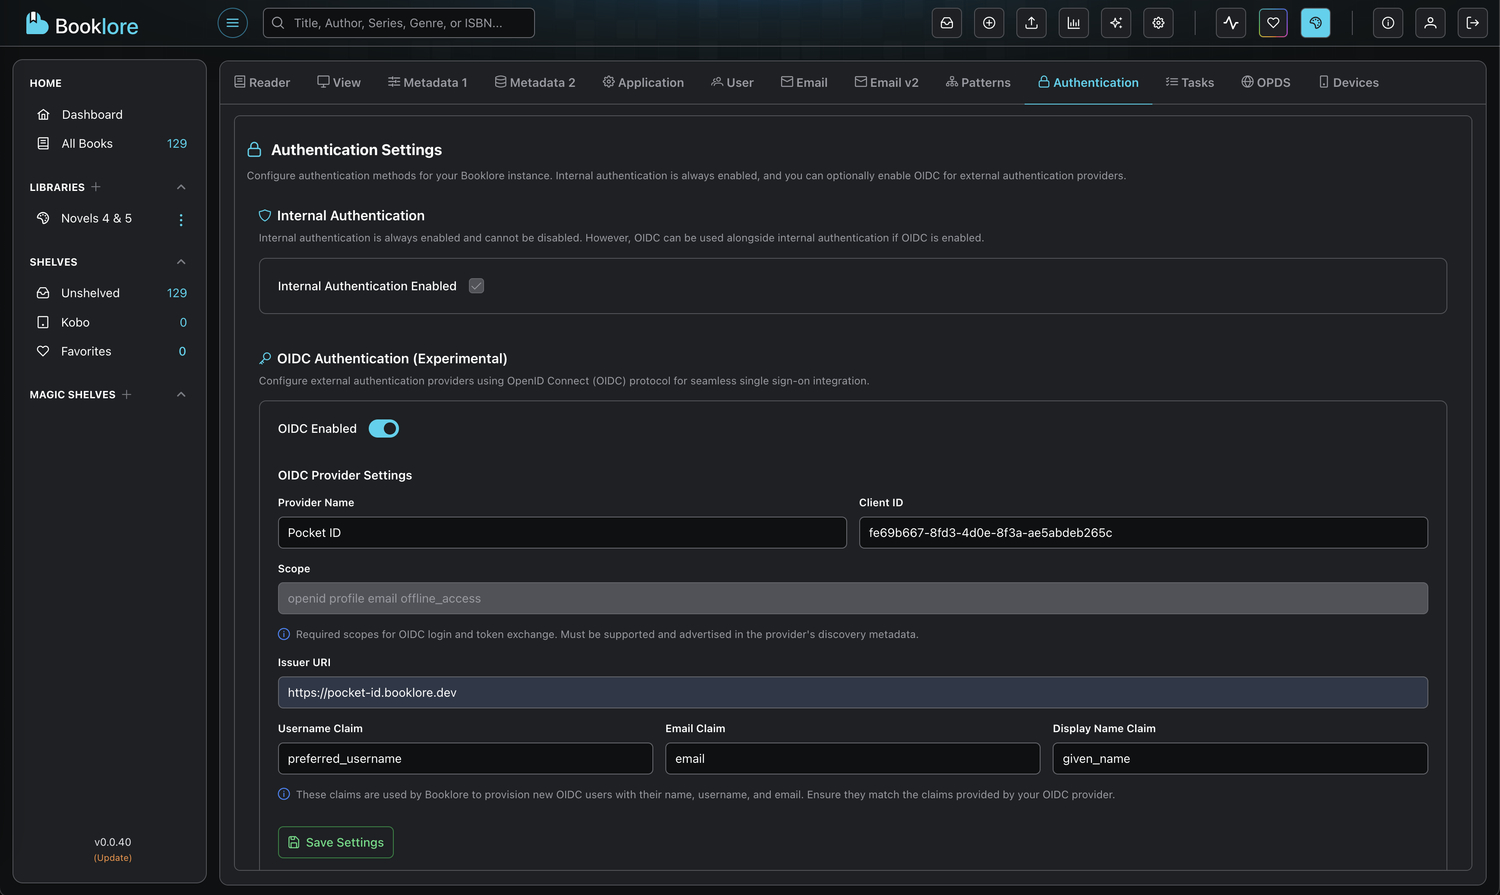
This is what the UI will look like once OIDC setup is complete:
2. Test OIDC Login with Existing User
Before enabling auto-provisioning, test authentication with a user that already exists in Booklore:
- Create a test user in Booklore manually (if you don't have one)
- Ensure the username matches what your OIDC provider will send in the configured username claim
- Attempt to log in using the OIDC provider
- Verify successful login and that user information displays correctly
Always test OIDC authentication with a known user account before enabling automatic provisioning.
This verification ensures:
- ✅ Your claim mappings are correct
- ✅ User attributes (username, email, name) are extracted properly
- ✅ The OIDC flow completes successfully
- ✅ You won't provision users with incorrect or missing information
If this test fails, fix your OIDC configuration before proceeding.
3. Review Claim Data (Optional but Recommended)
To ensure claims contain expected data:
- Check your OIDC provider's logs or user profile to verify claim values
- Use browser developer tools (F12 → Network tab) during login to inspect JWT tokens
- Confirm claim names and values match your Booklore configuration
Once OIDC authentication works reliably with existing users, you're ready to enable automatic provisioning!
Step 2: Enable Auto-Provisioning
Now configure automatic provisioning with appropriate defaults:
-
Navigate to Provisioning Section
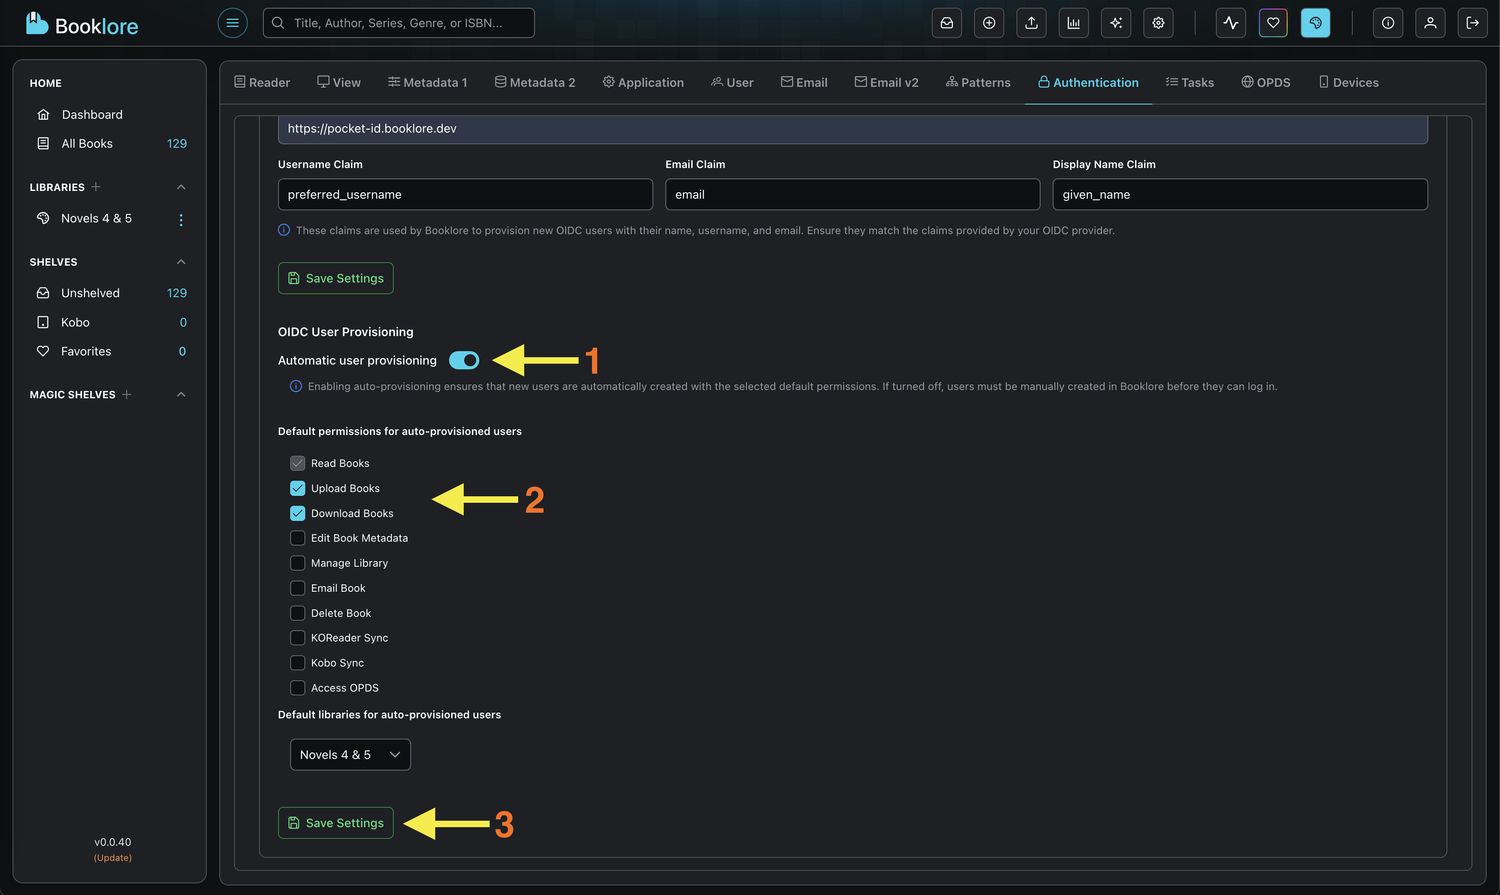
In Settings → Authentication, scroll to the "OIDC User Provisioning" section (visible when OIDC is enabled) -
Enable Automatic Provisioning
Toggle "Automatic user provisioning" to ON -
Select Default Permissions
Choose which permissions new users should receive automatically:- Read Books - Always enabled by default (cannot be disabled)
- Check additional permissions based on your user access policy
- Consider starting with minimal permissions
-
Select Default Libraries
Choose which libraries new users can access:- Select from the dropdown list of available libraries
- Multiple libraries can be selected
- Users will only see books in their assigned libraries
-
Save Settings
Click "Save Settings" to apply the auto-provisioning configuration
Automatic user provisioning is now enabled. New users authenticating through OIDC will be automatically created with your configured defaults.
🧪 Testing Auto-Provisioning
Step 4: Test with a New User
Verify that automatic provisioning works correctly before rolling it out:
-
Prepare Test Account
Create a test user account in your OIDC provider (e.g., Pocket ID)- Use a username that doesn't exist in Booklore
- Ensure the user has required attributes (email, name)
- Verify the account is active in the OIDC provider
-
Attempt Login
- Open a private/incognito browser window
- Navigate to your Booklore instance
- Click "Login with [Provider Name]"
- Authenticate with the test user credentials in your OIDC provider
-
Verify User Creation
After successful authentication:- User should be logged into Booklore immediately
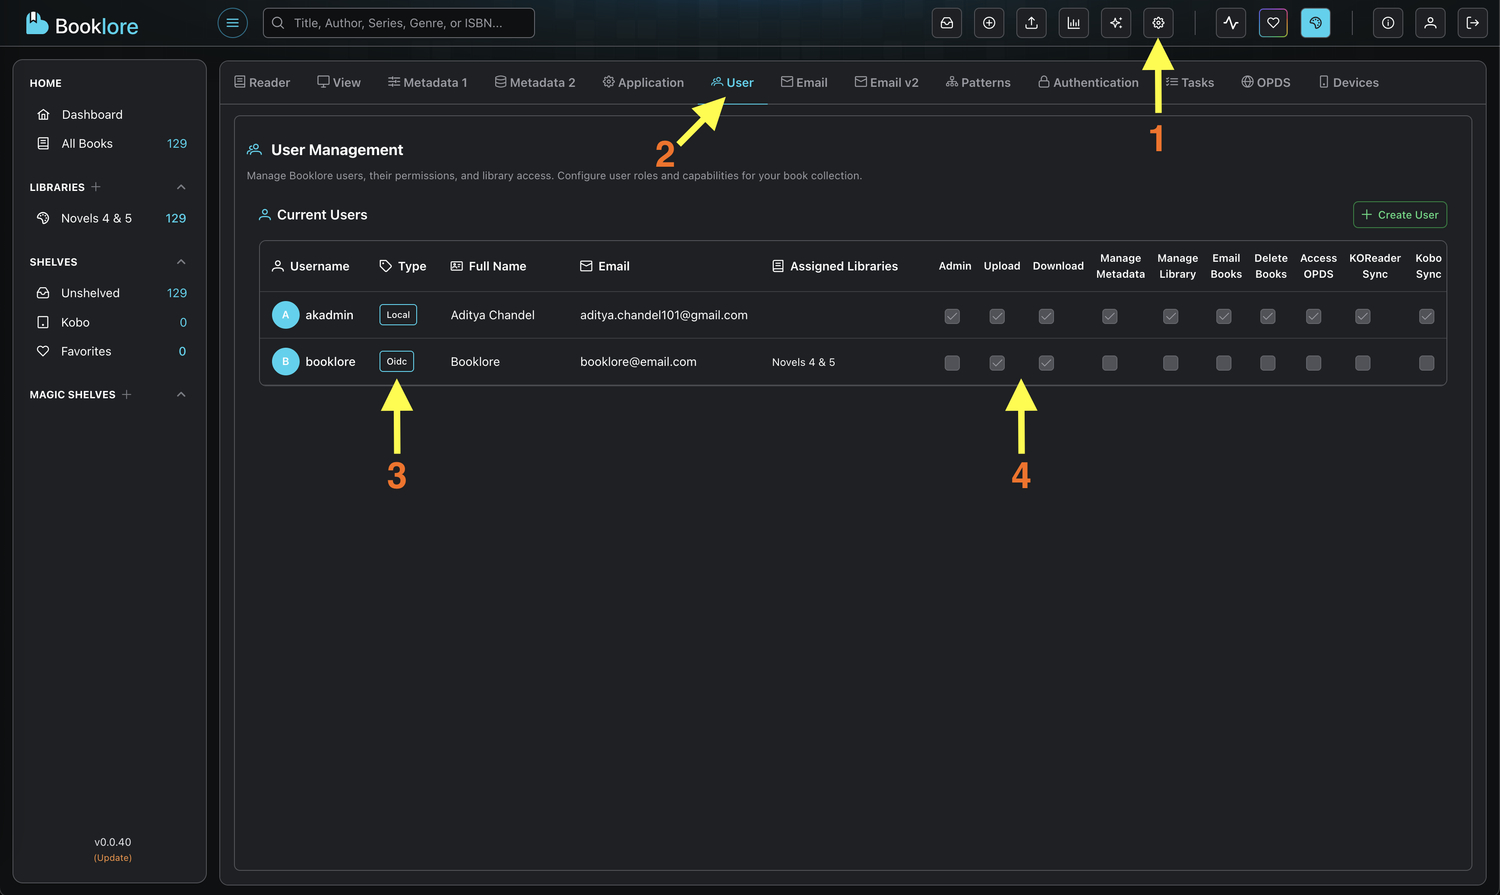
- Navigate to Settings → Users (admin access required)
- Verify the new user appears in the user list
- Check that the user has correct username, email, and display name
-
Verify Permissions
Click on the newly created user to view their details:- Confirm assigned permissions match your configuration
- Verify library access is set correctly
- Test that the user can perform actions according to their permissions
-
Test User Experience
Log in as the provisioned user and verify:- Access to assigned libraries
- Ability to use granted permissions
- Restrictions on non-granted permissions work correctly
Don't delete test accounts immediately. They're useful for verifying permission changes and troubleshooting issues that arise later.
🔄 Managing Provisioned Users
Viewing Auto-Provisioned Users
All users, whether manually created or auto-provisioned, appear in the same user management interface:
-
Navigate to Users
Go to Settings → Users to view all user accounts -
Identify Authentication Method
- Users have an authentication source indicator
- OIDC-authenticated users are marked accordingly
- You can filter or sort by authentication method
Modifying Provisioned User Permissions
Auto-provisioned users start with default permissions, but you can customize them individually:
-
Select User
Click on a user in the user management list -
Edit Permissions
- Grant additional permissions as needed
- Add or remove library access
- Changes take effect immediately
-
Save Changes
Click "Save" to apply permission modifications
Changes made to individual users persist even if you later modify the default auto-provisioning settings. Default settings only affect newly provisioned users.
Disabling User Accounts
If you need to revoke access for an auto-provisioned user:
-
Navigate to User Details
Go to Settings → Users and select the user -
Disable Account
- Toggle the account status to "Disabled"
- Or remove all permissions and library access
- Or delete the user account entirely
-
Next Login Behavior
- Disabled users cannot log in even if OIDC authentication succeeds
- Deleted users will be re-provisioned on next login if auto-provisioning is enabled
🛡️ Security Considerations
Controlling Auto-Provisioning
When to Enable:
✅ You trust your OIDC provider to authenticate legitimate users
✅ You want to minimize administrative overhead
✅ Default permissions align with your security policy
✅ Your OIDC provider has proper account management controls
✅ You're comfortable with self-service account creation
When to Disable:
❌ You need to review and approve each user manually
❌ Your OIDC provider allows unrestricted account creation
❌ Users require different permission sets based on their role
❌ You need strict control over library access
❌ Compliance requires manual account approval
Best Practices
- 🔒 Start Restrictive - Begin with minimal default permissions
- 👥 Regular Audits - Periodically review auto-provisioned users
- 📊 Monitor Activity - Track which users are being provisioned
- 🔐 OIDC Provider Security - Ensure your OIDC provider has strong authentication
- 🚪 Claim Validation - Verify claim mappings are correct before enabling
- 🛡️ Backup Admin - Maintain internal admin accounts as backup access
- 📝 Document Policies - Clearly define auto-provisioning policies for your organization
Preventing Unauthorized Access
OIDC Provider Controls:
- Implement strong authentication in your OIDC provider
- Use multi-factor authentication where possible
- Control who can create accounts in your OIDC provider
- Monitor and audit OIDC provider access logs
Booklore Controls:
- Set minimal default permissions
- Limit default library access to public or general libraries
- Regularly review and audit provisioned users
- Disable auto-provisioning if unauthorized users are created
- Monitor Booklore access logs for suspicious activity
🛠️ Troubleshooting
Common Issues and Solutions
User Not Being Provisioned:
- ✓ Verify auto-provisioning is enabled (toggle is ON)
- ✓ Check that OIDC authentication is enabled and working
- ✓ Ensure claim mappings are correctly configured
- ✓ Verify OIDC provider sends all required claims (username, email, name)
- ✓ Check application logs for provisioning errors
- ✓ Test with a known-good OIDC account
User Created with Wrong Information:
- ✓ Review claim mapping configuration in OIDC settings
- ✓ Check JWT token contents from OIDC provider to verify claim names
- ✓ Ensure OIDC provider is sending expected claim values
- ✓ Update claim mappings and test with a new user
- ✓ Manually correct existing users if needed
User Created with No Permissions:
- ✓ Verify default permissions are selected in auto-provision settings
- ✓ Check that "Save Settings" was clicked after configuration
- ✓ Review application logs for permission assignment errors
- ✓ Manually grant permissions to affected users
- ✓ Test provisioning with a new user after fixing configuration
User Created with No Library Access:
- ✓ Confirm default libraries are selected in configuration
- ✓ Verify selected libraries still exist in the system
- ✓ Check that library IDs are correctly saved in settings
- ✓ Manually assign library access to affected users
- ✓ Re-save auto-provisioning settings if needed
Duplicate Username Conflicts:
- ✓ Ensure username claim provides unique values
- ✓ Check for existing users with same username
- ✓ Consider using email as username if preferred_username conflicts
- ✓ Configure OIDC provider to append domain or unique identifier
- ✓ Manually resolve conflicts in user management
Provisioning Works But Permissions Don't:
- ✓ Verify user actually received configured permissions (check user details)
- ✓ Clear browser cache and re-login
- ✓ Check for permission-related errors in console (F12)
- ✓ Verify database permissions were correctly saved
- ✓ Test with different permission combinations
Viewing Provisioning Logs
Application Logs:
Check logs for entries related to user provisioning, OIDC authentication, and permission assignments
Relevant Log Entries to Look For:
- "Auto-provisioning new user: [username]"
- "Creating user from OIDC claims"
- "Assigned default permissions to user"
- "User provisioning failed: [error]"
🔄 Disabling Auto-Provisioning
When Manual Control is Needed
If you need to temporarily or permanently disable automatic provisioning:
-
Navigate to Authentication Settings
Go to Settings → Authentication -
Disable Auto-Provisioning
Toggle "Automatic user provisioning" to OFF -
Effect on Existing Users
- Existing auto-provisioned users remain active
- Their permissions and library access are unchanged
- They can continue logging in via OIDC
-
Effect on New Users
- New OIDC-authenticated users cannot log in
- They must be manually created in Booklore first
- Username must match OIDC provider exactly
Disabling auto-provisioning doesn't delete your configuration. Default permissions and library selections are saved. You can re-enable it anytime by toggling back on.
🎯 Best Practices
Recommended Default Settings
Conservative Approach (High Security):
Default Permissions:
- Read Books ✓
- Download Books ✓

Default Libraries:
- Public Library
- Welcome Collection
Balanced Approach (Most Common):
Default Permissions:
- Read Books ✓
- Download Books ✓
- Upload Books ✓
- Access OPDS ✓

Default Libraries:
- Main Library
- User Contributions
Liberal Approach (Trusted Environment):
Default Permissions:
- Read Books ✓
- Download Books ✓
- Upload Books ✓
- Edit Book Metadata ✓
- Access OPDS ✓
- KOReader Sync ✓
- Kobo Sync ✓

Default Libraries:
- All Libraries
Optimization Tips
- 🔄 Review Regularly - Assess auto-provisioning settings quarterly
- 📊 Track Metrics - Monitor provisioning success rates and user activity
- 👥 User Feedback - Gather input on whether defaults are appropriate
- 🔐 Security Audits - Periodically review provisioned user access
- 📚 Documentation - Keep user guides updated with current defaults
- 🎯 Role-Based - Consider multiple OIDC clients if you need different defaults for different user groups
Communication Guidelines
Inform Users About:
- How to access Booklore via OIDC provider
- What permissions they'll have automatically
- How to request additional permissions
- Who to contact for access issues
- Expected behavior on first login
Document For Administrators:
- Current auto-provisioning configuration
- Rationale for permission choices
- Process for adjusting user permissions
- Troubleshooting common issues
- Emergency procedures for disabling provisioning
📚 Additional Resources
- Pocket ID Authentication: Complete guide to setting up OIDC with Pocket ID
- OIDC Specification: Technical details about OIDC claims
- Security Best Practices: Guidelines for secure authentication and authorization
Automatic user provisioning streamlines the onboarding process while maintaining control through configurable defaults. With proper configuration and monitoring, you can provide seamless access to Booklore while ensuring security and appropriate permission levels for all automatically provisioned users.